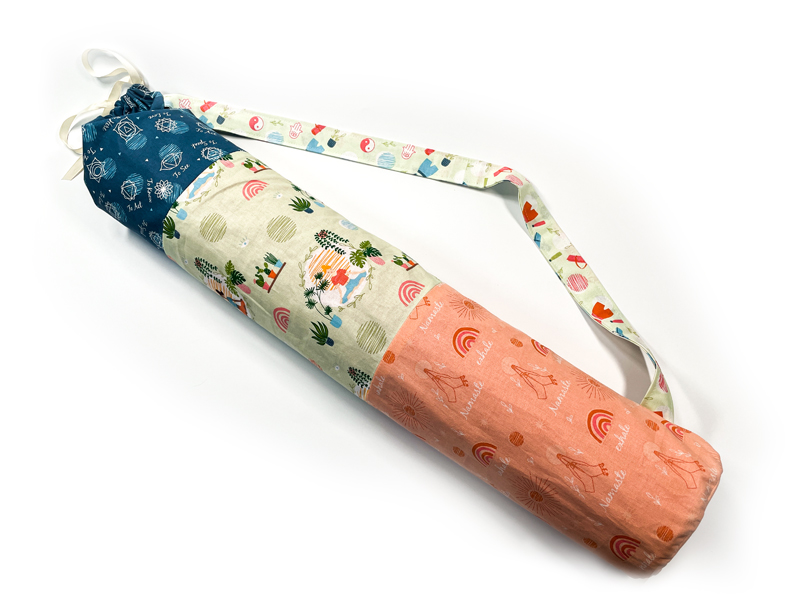
Fat Quarter Make; Yoga Mat Bag

When I saw this month’s gorgeous Yoga themed fat quarters, I knew exactly what I wanted to make – a stylish yet practical bag to store my Yoga mat in. Read on to find out how to make this simple drawstring bag with a carry handle – you’ll be surprised how quickly it comes together!
You will need:
- Fabric fat quarters – iron these to get any creases/folds out
- Tape Measure
- Ribbon or drawstring cord
- Sewing machine with a universal needle
- Thread
- Rotary cutter & cutting mat / Fabric scissors
- Pins / Clips
- Overlocker (Optional)
- Interfacing (Optional – if you want to make your bag more robust and hard wearing, I would suggest interfacing the main body of the bag)
Remember to back stitch at the start and end each time you sew – this is essential to secure your stitches.
I’ll be using a ½” seam allowance throughout, unless specified.
- First we need to measure our yoga mat using a flexible tape measure. You need to measure the length of the mat (when it’s rolled up) and also the circumference. Jot these measurements down.
Mine are: Length = 24”
Circumference = 14”
We’re going to add a few inches to each measurement to allow for seam allowance etc. I’m adding 5” onto the length and 3” on to the circumference. So my new measurements are: Length = 29”
Circumference = 17”
- We need to create a large rectangle from our fat quarters, measuring the length x circumference. To do this, choose which fat quarters you want to use for the main part of the bag.
Trim down the width of these to your circumference measurement, so I’ll be trimming mine to 17” wide.
Now we need to work out how deep each fat quarter needs to be so that when we sew them together, they total the length of our mat.
I’m using three fat quarters to create my rectangle, so first I’ll divide my length (29”) by three = 9.6” I’m going to round this up to 10” to make it easier!
Then I need to add seam allowance. My top and bottom pieces will be attached by one seam, so need ½” added. The middle section will be attached by two seams, so needs 1” added.
So that means I’m cutting two of my fat quarter pieces to 10.5” deep and the other one to 11” deep.

- Pin and sew these pieces together so you now have one large rectangle. You may wish to finish these seams with an overlocker if you have one. Press seams.

- To create your strap, cut a long rectangle the length of your mat x 5” (So mine is 29” x 5”). I had to join two pieces of fabric together to do this.
Press it in half lengthways, wrong sides together, then open out.
Now press each long edge into the centre fold (wrong sides together).
Now fold the whole piece in half, lengthways along the original foldline.
Top stitch down each long edge.

- Hem the long edges of your large rectangle by a small amount (Approx ½”)

- Fold the top short edge over by ½” and press (wrong sides together), then turn by another ½” and press. Stitch along the bottom edge of the fold. This creates the channel for our drawstring.

- Stitch the strap at the top and bottom of the long right hand edge of the rectangle on the right side of the fabric.

- Fold the rectangle in half lengthways, right sides together, making sure the strap is tucked inside. Pin and stitch (You must start your stitching BELOW the drawstring casing). Finish this seam on an overlocker if you wish.

- Measure the diameter of your rolled up mat. Mine is 4”. Then add on an inch. You need to cut a circle of fabric approximately this diameter. I found a bowl that was about the right size and drew round it.
Use lots of pins to insert this into the bottom of your bag, right sides of fabric together, then stitch. Take your time. But also – don’t worry about it being perfect. It’s only the base of the bag, no-one will notice a few tucks or puckers!

- Turn your bag right sides out. Then use a safety pin to insert approx 1m of ribbon or drawstring cord through the drawstring casing at the top of the bag.

And you’re finished – you’ve made a fabulous drawstring storage bag for your Yoga mat – much nicer to look at than the mat itself!
If you get stuck on any aspects of the tutorial, please feel free to send me a message and I’ll help.
I hope you enjoy making your yoga mat bag. Share your finished makes on instagram, using the hashtag #SewHayleyJaneFQ and tag me @sewn_on_the_tyne
See you next month,
Tamlyn xx