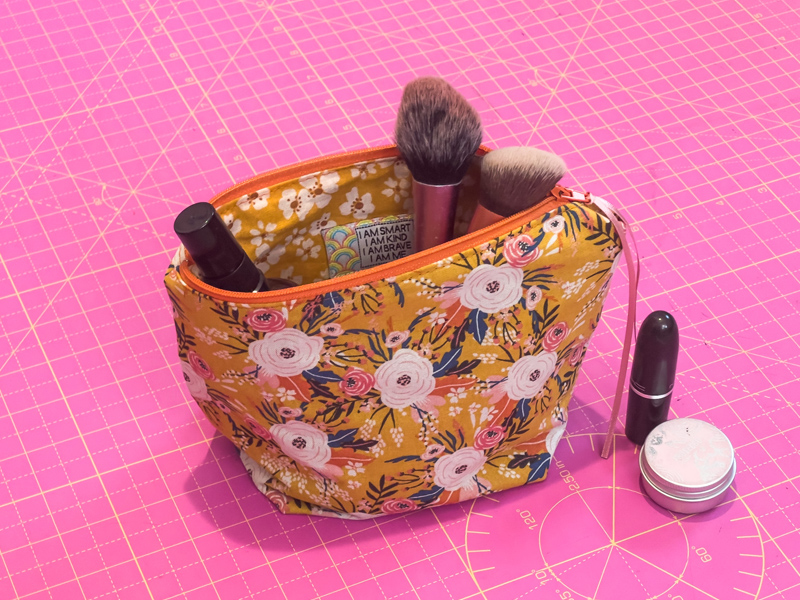
Fat Quarter Make; Make Up Bag

I first made this style of make-up bag a few years ago and it’s something I have given as gifts many times – in fact just last week I made 6 of these for my son’s nursery staff as a thank you gift when he moved up to the next room.
It’s a quick and straightforward make, but looks like a really lovely gift – perfect for birthdays, Christmas and everything in between!
Hayley will be sewing this project in a live YouTube sew along on Tuesday 21st June so make sure to gather your supplies, get your pieces cut to size and join us in making a gorgeous make up bag.
You will need:
- 2 fabric fat quarters – iron these to get any creases/folds out
- 0.25m Medium-weight fusible interfacing
- 9” Flat Zip (Can be longer and trimmed down)
- Approx 30cm of narrow ribbon – I use 3mm wide (optional)
- Woven label (optional) – mine is by Little Rosy Cheeks
- Sewing machine with a universal needle
- Thread
- Rotary cutter & cutting mat / Fabric scissors
- Pins / Clips
- Tape measure or ruler
Remember to back stitch at the start and end each time you sew – this is essential to secure your stitches.
I’ll be using a 1/2” seam allowance throughout, unless specified.
- Cut 6 rectangles with a length of 9.5” (24cm) and a depth of 8.5” (21.5cm):
2 from one fat quarter for your outer fabric
2 from one fat quarter for your lining fabric
2 from interfacing.

- Cut a 2” (5cm) square out of the bottom left and right hand corner of each rectangle.

- Use an iron to apply the interfacing to the wrong side of your outer pieces.

- If you are including a woven label, sew it in the centre, approx 1.5” (4cm) down from the top edge, of one of your lining pieces.

- Take one outer piece and lay it right side up in front of you. Place the zip, teeth side facing down, along the top edge of the rectangle.

- Place one lining piece on top, right side facing down. Pin or clip along the top edge.

- Sew the three layers together. I use a zipper foot here so that I can get quite close (but not TOO close) to the zip teeth. You will also have to open and close the zip at different points as you’re sewing to move the zip pull out of the way of the foot.

- Use an iron to press the fabric pieces away from the zip.

- Now repeat this process (steps 5-8) on the other side of the zip tape, paying close attention to which is your outer and which is your lining fabric.

- Change your machine foot back to your standard foot, or you could use an edge stitching foot if you have one. Sew a line of top stitching on either side of the zip – this will be visible from the outside of your make-up bag so choose a suitable thread.

- Open up your zip, at least to half way. Now place your outer pieces right sides together and your lining pieces right sides together. Clip or pin down each long edge and each short edge. I like to start by clipping the zip together at each side, matching up the top stitching I did in the last step.

- Sew the 2 long edges and 2 short edges together with a ⅝” seam allowance – BUT leave a 2-3” gap on the short edge of your lining pieces for turning through later. Go slowly as you sew over the zip. Please note – you are not sewing the cut out corner squares here.

- Go to one of your cut out corners. Put your fingers in to open it out and then press the raw edges together, making sure your seam allowances are going in opposite directions. Hopefully the photo makes this clear!

Repeat for all four corners.
- Sew a straight line across each of the four corners, using a ½” seam allowance.

- Using the gap you left earlier, carefully turn your make-up bag through so it is right sides out. Make sure you poke out the corners.

- Close up the gap on your lining pieces – I just do this on my sewing machine, as it will be inside the bag. However, if you prefer a more invisible finish, you may wish to hand sew this. Trim off any loose threads.

- Carefully press your make-up bag to get out any creases.

- Thread a length of ribbon through the zip pull. I use a pin to help pull it through.

And there you go – you’ve made a ‘Blooming Beautiful’ make-up bag.
You can easily adjust the dimensions to make a larger bag – it makes an extra gorgeous gift to give a set of these to someone you love!
You could also use a waterproof/wipe clean material to make a wash bag.
If you get stuck on any aspects of the tutorial, please feel free to send me a message and I’ll help.
We really hope lots of you can join us for a YouTube Live sew-along on Tuesday 22nd June!
Share your finished makes on instagram, using the hashtag #SewHayleyJaneFQ and tag me @sewn_on_the_tyne
See you next month,
Tamlyn xx